Pages

Thursday 26 April 2012

Hare Pendant

So very excited, because last night I finished my first piece of silver which I plan to sell properly (when I get around to it of course!)

I have been taking classes in silversmithing and silver clay for some time now off and on, but feel like I have finally made the breakthrough in knowing what and how I want to make jewellery.

Probably why this piece is so exciting for me, it represents a lot of time spent making stuff I've never really been very happy with, whereas with this piece I am estatic!! :)

I want to now put together a few pieces, coordinating and original,
and then I will work out how to sell them! 

Your thoughts and ideas welcome :)

Above: My hare necklace - how it hangs around the neck!

Above: Close up the shinyness makes the photo blur a little!


Monday 23 April 2012

Brand New Chickens!

Wow, the chicken auction was crazy! full of hundreds of people, some who knew exactly what they were after and who could assess the hen's for their health and fecundity in one glance, and others who pointed and said 'ooh that's a pretty one'.

Unsurprisingly, we fell into the latter category, and chose our hens mostly because they looked cute and colour coordinated with each other.

We chose a lovely Lavender Orpington (Mildred) who is a gorgeous lavender grey colour (very Farrow and Ball), and a Cream Legbar (Betsy) because they lay blue eggs (I know!) and a pair of Partridge Brahma's (Mr Cock and Audrey), because every man needs a massive cock (so the boy tells me!) and this one is particularly impressive!
Above: Mr Cock looking mighty fine in his new home!
Outside the chicken house I painted myself linky here!

Above: Mr Cock and his brood -Audrey, Betsy and Mildred (l to r)

Above: Betsy, Audrey and Mildred's backside!


Already we have had 4 eggs (although one was trodden on in the excitement), and although I knew I was going to enjoy having them, I never realised how quickly I would become attached to them!

Betsy is the youngest and smallest, and was at first a little hen pecked by Audrey, but Mildred won't let her be bullied and stands up to Audrey on Betsy's behalf (I love a chicken with good moral values), and now things seem much more harmonious.

Mildred makes a great commotion for about 30 minute before she lays an egg, whereas both Audrey and Mr Cock both go crazy after Audrey lays an egg.

I am now really concerned that some sly fox will come accross them and get through the chicken wire - I had no idea they could do that, and so my next task will be to buy some heavier gauge wire mesh and try to make it all more secure - any advice on how to do this will be greatly received.

I also picked up a gorgeous vintage wire egg basket at the auction, and will be sprucing it up very soon with pictures to follow.

Right off to make an omlette! ;)

Wednesday 18 April 2012

Framing Vintage Wallpaper

Forget vintage, antique most probably....

So we are moving the fake beam covers from the real beams (crazy I know, but another quirk of the previous owners taste), and generally re-vamping the littlest bedroom, and suddenly, from some dark corner of the room, hidden behind a panel that had been in situ for perhaps one hundred years, we spy a little fragment of colour:
Above: The wallpaper in situ, as we found it behind an old panel.


The style, and the age of the wallpaper immediatey gets me in an excited tiz and so the boy carefully extracts the rest of the strip as carefully as possible.


With a hessian back I'm guessing this is pretty old, and I LOVE IT!

Funny how tastes turn full circle!

So I brought a large white frame to display the wallpaper, and it is currently the centre piece over the fireplace in the snug. 

Above: The wallpaper fragment has pride of place on the mantel in the snug.


I love the fact that it is from the house - it feels like a present, and we get to preserve a little moment of the property's history. :)

My little secrets:
Frame fragments of wallpaper from your house - the weirder the better! Create a collage and they will great, and represent your house's past style (no matter how unlikely you would be to choose them yourself!).
Frame: Approx £10 from The Range
Ickle Teddy bear - Steiff (a much treasured gift).

Tuesday 17 April 2012

Simple Beef and Guinness Pie Recipe

Just had to share this recipe, it is the BEST meat pie recipe I have ever found - and so surprisingly easy to make, and if you have no pastry it works perfectly with some creamy mashed potato!
Ingredients:
Pack of frying steak
Sea salt and freshly ground pepper
2 heaped teaspoons of plain flour
Olive oil
Pack of mixed stewing or soup vegetables for speed (or chop them yourself!)
Pinch of mixed herbs
1 (500ml) bottle of Guinness
1 carton of passata
Roll of ready made pastry - either puff or shortcrust or both depending on preference!
1 egg, beaten or milk (to brown top)

Preparation:
 1. Mix beef with olive oil, salt and pepper, and flour until coated and then fry meat in a casserole dish until brown.
 2. Add the vegetable pack fry for a minute or two and add herbs
 3. Pour in the Guinness
 4. Add the passata and bring to the boil. Stir well, then simmer for 2 hours or until the meat is tender.
 5. By now the sauce should be nice and thick with an intensely tasty flavour. Season if required.
 6. To make the pies, preheat the oven to about 200 degrees.
 7. Line a pie dish with short crust pastry and pour the mixture into the dish
 8. Cover the top with either shortcrust or puff pastry and pinch the top and bottom together.
 9. Slice lines into the top of the pie with a sharp knife, and brush the top with the egg or milk. Use leftover pastry to create a heart design on top if you are a fancy pants like me! ;)
10. Put in oven for about 30- 45 minutes until golden and bubbling.
11. Dig in! ;)

Alternatively, make Cornish pasty style pies with no pie dish using either puff or shortcrust - yum :)

Monday 16 April 2012

Planting the fruit cage

So we went to a plant auction at the weekend - expensive move!

However we are now the proud owners of 12 raspberry canes, 3 redcurrant bushes, 1 gooseberry bush, 2 tayberry plants, 2 blueberry plants, an apricot tree and a cherry tree - phew!

Bidding on them was fun, planting them all was hard work! However, the lovely boy and I managed to do the lot and put up the new polytunnel too!

(The fruit cage is yet to be purchased, I have seen a nice big one online, and so made the fruit bed the same size as the fruit cage just in anticipation that the bushes will grow big and be fruitful and need to be protected! ;)

Here is the rather lovely new polytunnel (which was a massive bargain!)

and here is the fruit bed/cage (when it arrives!) planted with all the lovely fruit bushes.
Fingers crossed for some lovely fruity treats this summer!

My little secrets:
Polytunnel: only £35 from eBay!
Fruit area, planted with weed barrier membrane covering the area - hoping this will make it much easier to maintain!

Friday 13 April 2012

Vintage Mirror Makeover

Mirror mirror on the wall...

So we went to an auction at our favourite auction house that specialises in antiques and bric a brac, where things sell for as little as £1 right up to £1000's and more often than not it is possible to pick up a bit of a bargain, and I spotted a lovely oak framed mirror which was ornately carved with flowers all the way around.

the original frame was in good condition, although it did have a couple of cracks and the wood had a dark varnish on it, making it look a little dated and gloomy.

Sooo, with a tin of F&B's Lamp Room Grey (I know I'm so predictable), I set to work and this is the result I am more than happy with:


Now it is just a case of deciding where to hang it - I am thinking sitting room? hmm....

My little secrets:
Mirror: From a little weekly bric a brac auction, we paid approx £40
Paint: Farrow and Ball's Lamp Room Grey (emulsion - I know) painted with a little craft paint brush in front of the fire whilst watching the TV! ;)

{Primp}

Thursday 12 April 2012

First Impressions Count - Revamping the front door!

So when we brought the small holding the front door was pretty minging - broken glass window filled in with bubble wrap, scuffs and marks, and all varnished an unlovely orangey brown - yuck.
Above: Before - yuck

We thought about replacing it, but then I realised I really wanted a painted front door anyhow, and the paint would hide the filler and joins if we were to repair, and so I designed the new look door which included a smaller diamond shape window to replace the large rectangle and here is the design I came up with:
Above: My completely not to scale design!

I brought a grill to fit around the window perfectly, and got my clever dad to rout out some matching lines in a piece of chipboard which fit in the top part of the door perfectly.  A new piece of glass and a paint job later and (drum roll please) we ended up with this:


Above: Our gorgeous 'new' front door!

Looks like a completely different door don't ya think?!  The paint is Farrow and Ball Lichen (exterior eggshell). Best thing of all (at least so the boy would say) is that this little revamp was a whole lot cheaper than a new front door - so everyone's happy! ;)

My little secrets:
Door paint: F&B Lichen, (lady in shop v helpful)
Door grille: ironmongery direct (fab next day service)
Door knocker: Rockett St George (luv it!)
Grape Hyacinths: Ikea 69p (I know!)
Door mat: Ikea (the coir keeps falling out tho which is a pain)
Wellingtons: Hunter (of course)
Horse shoes: From the paddock!


Tuesday 10 April 2012

Bedroom Blitz - (before and during) tbc...

So the Easter holidays were a-maz-ing, because we spent all four days together, covered in dust and paint and more dust, and at the end of it we have a pretty gorgeous bedroom (if I do say so myself!).

Firstly you need to see the before shot, and remember that the floor was all scuffed up and stained, and the yucky wallpaper was a flowery beige crime, and the walls an icky magnolia with loads of pit holes. Other that that it was in pretty good nick, and definitely the best room in the house when we moved in.
Above: icky wallpaper and scuffed up floor :(
Day 1: Firstly, we filled, sanded and prepared the 3 painted walls (there were a lot of cracks to fill), and painted over the manky wallpaper with F&B Downpipe No 26, then we painted over the 3 remaining, tear inducing, magnolia walls with a crisp brilliant white - what a breath of fresh air!

Day 2: We sanded the oak floors - they only needed a fine 120 grade sanding (as they weren't that bad really), we coated them with Danish oil, and left them to dry.

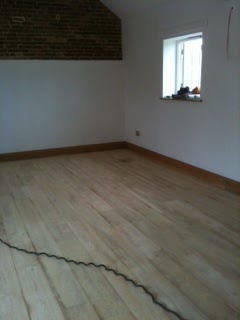
Above: During - bedroom floor - part way through - sanded but not oiled but  already looking great!
Above: After - the lovely oak flooring oiled with natural Danish oil :)

(It is worth pointing out that at this stage, all our bedroom belongings were outside in the courtyard exposed to the elements - fine when the sun was shining, not so great when the heavens decided to open - cue me running around with plastic decorators sheeting and masking tape desperately trying to protect the sofa, bed and wardrobes from the worst of it - not hilarious)

Day 3: (Easter Sunday): Spend the day painting the window frames (F&B Lamp Room Grey), and then moved on to the wooden furniture - (see my updating pine furniture post here).

You need to know at this stage that the bedroom furniture was a mixmatch of all colours of pine, from the untreated bare kind to the orangey shiny kind - not a great look for a restful, coordinated and fabulous bedroom see below:

Above: Before -yucky shiny orangey pine drawers - blurgh.

Now I know you probably want to see the 'after', the 'before' and 'during' is a bit of an anti-climax, but I am not quite ready yet, just a few more finishing touches and then I'll post them - promise! :)

Thursday 5 April 2012

Updating Pine Furniture

I remember when pine furniture was all the rage. I would look at my white melamine faced chipboard drawers in my childhood bedroom and only dream of something so extravagant as pine furniture. 

I think it is safe to say that times have changed, and after a massive influx of affordable pine furniture swamped the market, our tastes have evolved and quite frankly pine furniture is not what it was.

In our master bedroom we have some older good quality pine drawers and bedside tables, and some really quite flimsy and brand new pine wardrobes. They looked a mismatch together, and the orangey colour dominated the room - not great.

Above: Before - orangey pine drawers and boring handles - bleugh
(whoop for Ugly Betty though!)

The solution? Well, we decided to give them a new lease of life with a coat of F&B's Lamp Room Grey, which is a mid toned grey/blue colour, which also really compliments the strong grey blue of F&B's Downpipe which we used on our feature wall.

And, and, my favourite design feature of the whole master bedroom has to be the drawer handles I sourced. We needed 48 of them in the end, and I requested all different styles but all blue and white in colour - who knew we had so many knobs!

 
Above: I HEART THESE KNOBS!

And so I did cheat a little, I brought undercoat but thought I'd just see if I could get away without using it, and I only flipping did :)

Above: old pine drawers painted and with new 'mismatched' porcelain knobs!

And here it is up against the Downpipe, the colours really compliment each other, and the drawer knobs add a touch of femininity and originality in an otherwise masculine coloured room.

Above: After - the two colours working together

And the brand new flimsy wardrobes didn't come up too bad either, again no undercoat (don't tell my Dad), and they have come up lovely, and look much more expensive than they previously did.

Above and below: After - the painted wardrobe suddenly looks more expensive!
 Hurrah for wood paint :)

My little secrets:
Old pine drawers: ours were inherited, but try an auction house or a secondhand furniture shop such as a charity shop
New pine Wardrobes: Argos, cheap as chips really, a 4 door wardrobe with drawers underneath was £150 (Scandinavian range), but they are probably not best for high usage, as they are a bit flimsy
Paint: Furniture: Farrow and Ball, Estate Eggshell in Lamp Room Grey, Wall: Downpipe in Modern Emulsion
Knobs: from a lovely lady, worked out at about £70 for all 48 http://www.macandmehome.co.uk/
Knitted heart: christmas decoration that just stayed up!
Mirror: TK Maxx (chipped corner you can't really see - so £15)
Crystal based lamp: Home Sense about £29 (the lamp shade is going I have just decided!)


Tuesday 3 April 2012

My very own Vegetable patch/ plot of heaven ;)

Well it is kind of obligatory, you have a house in the country you have to grow veggies... But more that this, I have been wanting a proper vegetable patch for as long as I can remember.

When I lived in smaller houses with tiny gardens I would grow them in amongst the flowerbeds, the tomatoes dwarfed the other plants and the sweetcorn - well that just looked ridiculous, so to have a dedicated patch to play with, tend, grow and experiment in really is my idea of heaven!

19 sleepers, 4 tonnes of soil and lots of sweat, blisters and a hot bath later, we created this:
 Above: taken first thing in the morning there is even a little frost on our lovely veggie patch!


My little secrets:
4 tonnes of soil: Have a very fit and lovely boy to shovel and move it all ;)
19 sleepers: Same as above!
Fixings: Fix the sleepers together with nail plates and long decking screws (Screwfix - good for next day delivery!) 
Sourcing these items: google search lots of places, don't dismiss those that are far away as they sometimes have local distribution points. Ask for a discount - it worked for me! 

Monday 2 April 2012

Painting the Chicken House - chick chick chick chick chicken...

Have to have chickens on a small holding (it is the law I believe ;).

So we cleared out the overgrown chicken run and chucked the old falling down chicken house, and picked up all the rubbish and dead chickens (yes really!) and we are left with a lovely large chicken run needing its chicken house!

I saw a wonderful one on ebay, all pretty colours and very cute but £300, and then I found this one, a very similar style and a reasonable price and just in need of a paint job!

Above: Before - The very reasonably priced chicken house sans paint

So I brought one, got some garden paint and one sunny afternoon it turned into this:


Above: the newly painted and quite lovely chicken house in situ in its run.

Really pleased with the result - just need the chickens now... tbc

My little secrets:
Chicken house: eBay £89 (inc free next day delivery!)
Paint: Cuprinol Garden Shades (Heritage), Country Cream and Wild Thyme

Sunday 1 April 2012

Moving to the country, gonna eat me a lot of peaches...

Some time in September 2011 we met an estate agent some where in the middle of nowhere, and viewed our new house - a beautiful old farmhouse ripe for renovation and set in a courtyard of gorgeous falling-down barns, surrounded by 9 acres of paddocks, woodland, overgrown gardens and orchards - our dream!

Four months later and we were in, stupidly happy and just as excited! In the first 6 weeks we have already achieved a hell of a lot and the alterations and improvements are coming thick and fast, and that is the reason for this blog really, to track all of what we are doing and have done to the farmhouse and land, and to share our experience in words and images with anyone who happens to be interested!